Sunday, August 11, 2013

[TUTORIAL] Homemade Desk Organizer

hello guys! how was your day? i'm back with tutorial again!
hahaha, but before i give it i just want to tell that i changed my homemade makeup box to be like this:


I changed it because i thought that the first box i made was bad and i found that my table will be bigger if i put it flat. hoho!
okay, back to the main topic! Yunno, i'm lazy and just now my diligent mood (?)*lol* is back so i cleaned my table & my desk! haha. my desk was very messy. idk why it could be like that, lol. i forgot to take the picture "before/after" so u can compare it :b
Hmm, okay. let's begin! i think i will use english for this time, hoho. sorry for the bad grammar yeah~

What you need:
- Boxes (the size is depends on you) [1 extra-medium box , 2 or more medium boxes]
- Wrapping paper/magazine
- Scissors
- Glue
- Ribbon (if you want)

Let's start!!!

STEP 1

This is my extra-medium box :)
I forgot to take picture of the other boxes *fool me*


STEP 2

Wrap the medium boxes with wrapping paper

STEP 3

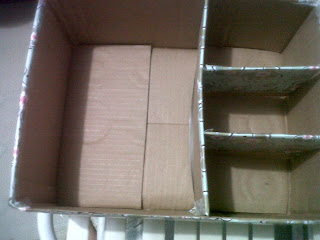
After that, put the medium boxes into the extra-medium box.
*because my things aren't too many, i just used 2 medium boxes*

STEP 4


Put your things to your homemade desk organizer ^^ and DONE!

FINISHED

You can put ribbon or other things too to ur desk organizer.
Honestly, i was inspired by watching this: www.youtube.com/watch?v=ZOAkIHiuXlo
But the first homemade is my idea yeah :b hoho
Now, your desk organizer is done! I know, mine is really bad. But at least, *once again* my desk got bigger and i can use it nicely.
Sorry for the bad grammar and the bad pictures :( my fault-_-


Now your desk is tidier :)

Hoho, finished! See u guys in the next post!
Much love, xoxo.


Friday, August 9, 2013

[TUTORIAL] Homemade Make up Box

Hello guys! Long time no see >< hihihi.
I am back with tutorial :b i will give the tutorial for my messy homemade make up box T_T
i know it's very super bad but i just want to post it T_T
i'll use Indonesian for this ^^ hehehe.

Materials/Alat/Bahan:
- Kotak (ukuran disesuaikan)
- Lem
- Gunting
- Penggaris, pulpen
- Kertas kado

Let's begin!

STEP I
  
Gunting bagian depan kotak.


STEP II
    
Ambil sisa kotak/kardus, gunting sesuai dengan ukuran kotak agar bisa menjadi pembagi. 

STEP III
  
Lapisi kotak dengan kertas kado.


STEP IV
  
Setelah semua bagian sudah dilapisi kertas kado, masukkan bagian pembagi itu ke tengah kotak.

STEP V
  
Jika anda ingin membuat pembatas/pembagi lagi, silahkan. Sesuai dengan kebutuhan dan selera.


STEP VI


Setelah semua bagian selesai, taruh barang-barang/make up yang ada miliki

FINISHED

*tips: Usahakan ada penyangga di bagian pembatas, penyangga bisa berupa kardus yang lebih tebal. Jika tidak ada, harap di lem dengan kuat dan usahakan jangan menaruh barang yang terlalu berat*
*NB: Jika anda ingin menaruh datar, juga bisa. Sesuai kebutuhan anda*
*SORRY FOR THE BAD PICTURES :( MY FAULT*

HAHAHAHA, How was it? Too messy right? Yunno, i'm not tidy person but i was trying my best. lalala~ i hope u can enjoy it ^^ and make it more tidy-.-

I stood it because my table is small enough because of those things *look at the step VI's things. LOL*

I think i want to do some more for my desk, i hope i can do it better than this. Oh man, this is really messy, i felt sad after did it, hahaha! Poor me. But at least, my table is bigger now. hehe.
Okay guys, see u in the next post . Much love, xoxo